Skip Navigation Main Navigation Side Navigation Contact Information

[Honda, Car electronics]

2008 Civic, removal of two 8mm bolts holding the radio unit

Edit Date: Sept. 5, 2021, 2:14 p.m.

Installing Android head unit in Honda Civic is rather easy in 8th generation Honda Civic vehicles. However, there are two tricky issues. Here is one of them, which is to remove the 8mm bolts that hold the radio. The two 8mm bolts are seated in rather difficult way.

Using Phillips screw driver could round off the bolt.
Parts and tools required for the tutorial
1. 2 Piece stubby ratchet, 3/8" and 1/2"
2008 Civic, removal of two 8mm bolts holding the radio unit, None|bekomcar.com

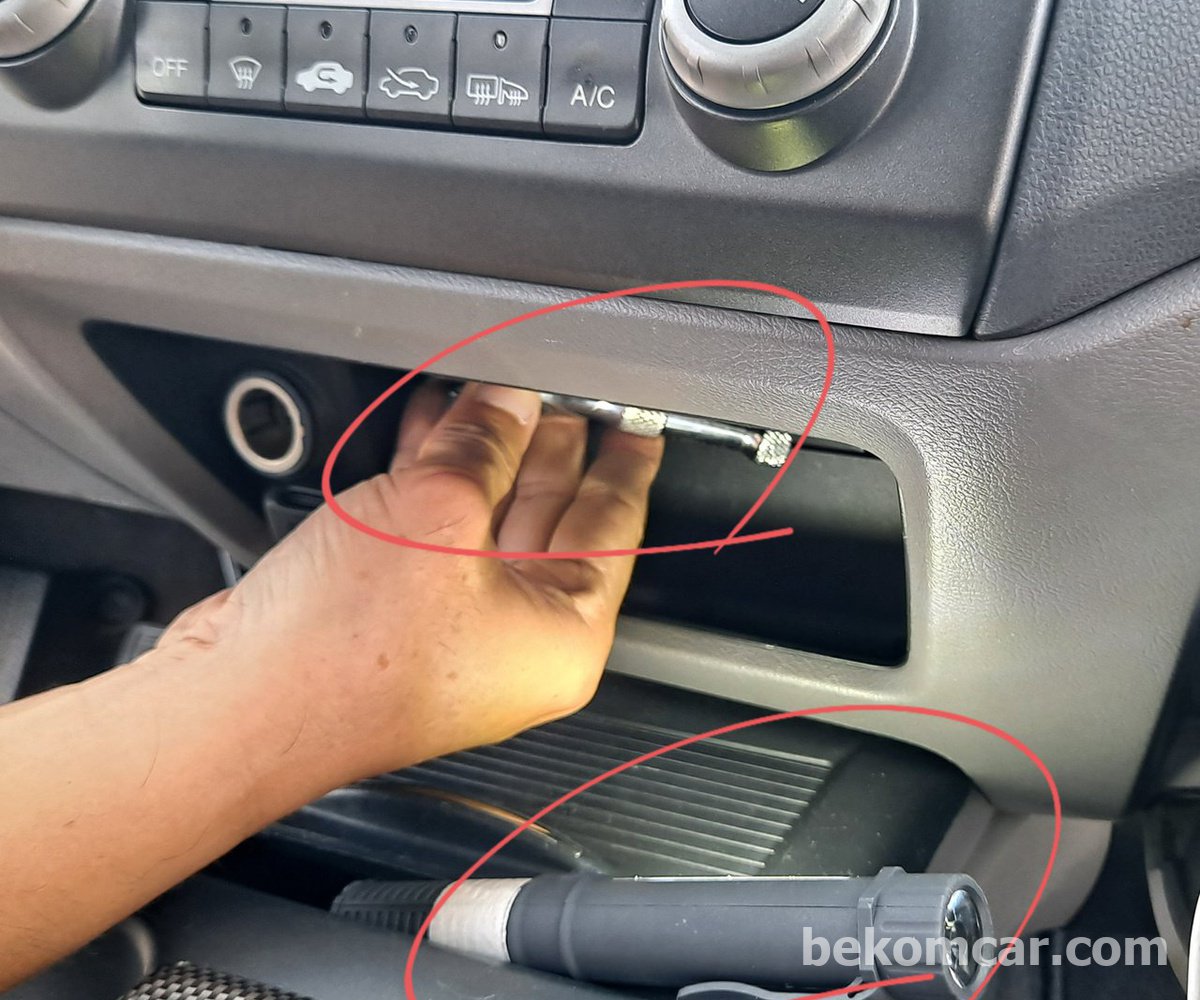
(1) Locate the 8mm bolts holding the Civic radio

The bolts are not easily visible because of awkward location in a very tight space. There are two bolts seated left and right. Stick in your fingers and feel the location of the bolts. Use may use mirror with the lights for easier location findings.-

(2) Break loose 8mm bolts with 1/4" ratchet 8mm socket

Once the bolts are located, use 1/4" ratchet or stubby ratchet with 8mm socket. First break loose and then unscrew the bolts. The 8mm bolt torque is not strong. I find the stubby ratchet is quite good for tight space operation.-

(3) Once 8mm bolts are broke loose, unscrew the bolts

The trick I used was the make best of the stubby ratchet with duel 3/8" and 1/2" ratchets. While 3/8" 8mm socket was seated on the 8mm bolt I with the other hand spun the 1/2" ratchet.-

(4) Here are the bolts removed finally from Honda Civic radio unit

After all those efforts, here is the 8mm bolt removed. Again, from experiences using a stubby ratchet with 8mm socket is the easiest way to remove the 8mm bolts.-

(5) After bolt removal, remove the radio unit

Using your favorite trim remover, pry the radio unit out from the top left and top right first. And then hold down the bottom of the radio unit and pull off the radio unit.-

Related contents

Need to login to leave the comments
Feb. 18, 2022, 3:41 p.m. - SunJoo Moon moderator  
시빅이나 어코드등 혼다차량 일부는 볼트는 처음해보는 경우 그리고 적절한 연장이 없는경우 고생을 한다. 꼭 연장을 챙기고 작업한다.
|
List

Top contents

There are no contents yet

QR Code

bekomcar is your life long used car partner

Used car pre-purchase inspection, car repair, car resell and export car services.

bekomcar.com

bekomcar provides reliable used car pre-purchase inspection, oil change, and resell services.


Services

  1. Pre-purchase inspection of used cars
  2. bekomcar Health Checkup
  3. bekomcar academy
  4. Other car related services

bekomcar friends

  1. Honda Club. The leading Honda club representing all Honda cars.

Repair Q&A

  1. BMW 528i xDrive 2012년 실화, 다수의 실린더: 감지됨 및 3번 실린더 실화 그리고 다수의 실린더: 분사 OFF 됨 등 고장코드가 있어요. 이미 헤드리빌드, 터보차져교환, 점화코일 점화플러그 교환했어요.
  2. 혼다 어코드 10세대 머플러에 물 이 차서 철렁거리는데 어떻게 빼낼까요?
  3. 현대자동차 스팅어 3.3 P007800 배기밸브 제어 솔레노이드 회로 이상(뱅크1) 고장코드 스캔됩니다.블로우밸브 맵센서 솔레노이드 교환했는데 여전합니다.
  4. 렉서스 NX350 하이브리드 차량으로 뒤차고센서 교환후에도 고장코드 B241A가 계속 뜨고 삭제가 되지 않네요. 계기판에는 Headlight System Malfunction Visit Your Dealer 라고 되어있습니다.
  5. 배터리 상태를 파악하는 가장 확실한 방법이 무엇이 있을까요? 배터리 교체를 해야 한다고 하는데 교환시점이 되었는지 궁금합니다.
  6. 쉐보레 임팔라 3.6 16년식입니다. 중고차로 구매하였고 몇가지 문제점을 느껴 질문드립니다. 데이터값은 토크프로 어플로 자주 확인하는데 Evap 값이 항상 - 값으로 나옵니다. - 로 표츌된다는건 퍼지밸브가 열린상태로 고착되었다고 판단할수 있을까요?어쩌다가 한번씩 + 값이 되는걸 볼수 있는데 거의 드뭅니다. 그리고 시트 툭툭 치는 증상이 느껴져 점화코일, 점화플러그, 엔진마운트 4종, 엔진오일 교체 하고 증상 많이 개선되었으나 강도의 차이만 있을뿐 여전히 느껴집니다. 이 증상 때문에 데이터값을 유심히 보다보니 뱅크1 뱅크2 양쪽 연료분사 시간이 차이가 나며 장기연료 보정 값도 뱅크1 뱅크2 차이가 나는걸 확인하였습니다. 연료분사시간 - 뱅크1 0.8 / 뱅크2 0.9 장기연료보정 - 뱅크1 -6 ~ -10 / 뱅크2 ± 2내외 퍼지밸브 값이 정상인지 아닌지 이로 인해서 연료분사 시간과 장기연료보정 값이 영향을 받고 있는 것인지 궁금합니다. 시트 툭툭 치는 증상도 이로 인해 발생할수 있는지도 궁금합니다.
  7. BMW 2015년 640i N55엔진 점화코일 교환하고 점화플러그 랑 인젝터 다 교환했는데 아주 간헐적 실화랑 부조가 발생합니다.

Copyright © 2025 bekomcar.com
Terms & conditions/ Privacy/ Accessibility/ Credits/ Cookies policy
#61, Rocketeer, LafestB, 60-30 Jungang-ro 1275beon-gil, Janghang-dong, Ilsandong-gu, Goyang-si, Gyeonggi-do, KOREA